


In the latest installment of our Up for Upcycling campaign, we’re working with Hermione Chantal, a Youtube star who specialises in interiors. Hermione loves making DIY projects that are budget friendly. We challenged her to turn something old into something new and here’s how she got on.
Over the last 10 months, I’ve been renovating an old “fixer upper” of a Victorian Home. It’s been a labour of love, with a few ups and many downs, but I’ve tried to do it within a really tight budget, opting to upcycle and turn my hand to DIY where possible.
Fixing up a home can be a daunting task, whether you rent or buy, but it doesn’t mean that you need to throw money away on brand new furniture and expensive fixtures in every corner of your space. Sunny recently did some research and found that 82% of renters spend their own money on making home improvements, spending on average £880. When I was renting, the last thing I wanted to do was spend money fixing up the landlord’s house.
So, when Sunny challenged me to the #UpForUpcycling challenge, I was really excited to give some old pieces of furniture a new lease of life, to share the message that fabulous furniture doesn’t have to cost a fortune.
I decided it was about time I tackled my office space. I’d previously given it a temporary makeover, but had since been gifted an old desk (which was formerly a dressing table) from a family member, that needed a little bit of love to get it looking fresh and new again. This prompted me to think about what else I could do with the space, and what other items I could find to upcycle.
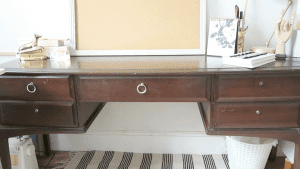
The desk seemed to be a daunting task at first, I wasn’t keen to get started, thinking that it would take hours to get it looking nice. However, two coats of chalk paint later and the desk was looking brand new. I opted for chalk paint as it needs very little prep work, wooden furniture needs thorough sanding before painting, but this can be forgotten with chalk paint as it adheres really well to most wooden surfaces. I also didn’t need to prime the piece with an undercoat, which saved a huge amount of time and a few pennies too. The paint dries quickly, and only needs a gentle sand with a fine grit sand paper in-between coats to give it a professional finish.
To seal the piece, I used furniture wax, which is incredibly easy to apply and gives the piece a slight sheen, whilst protecting the surface from chips and scratches.
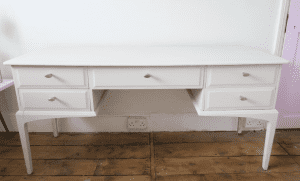
Once dry, I changed out the old, broken handles for a set of shiny, modern silver drawer pulls, which changed the look of the piece of furniture. A quick change of handles is an easy and inexpensive way to upgrade any old furniture that needs a little something to brighten it up.
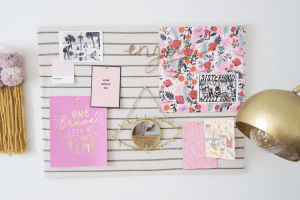
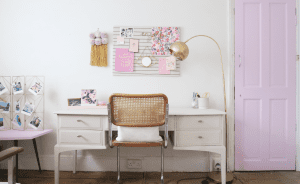
Besides the desk, I picked a few other bits out to makeover in the challenge video. I found an amazing standing lamp in a charity shop for £10, that just needed a lick of paint, an old pin board from my grandmother’s office, a tray and a small vase. I upcycled the smaller items with easy hacks and spray paint to get them looking cohesive and new. When styled together, the space looks like this:
This challenge took a weekend of DIYing, and cost under £20 in total (£10 for the lamp and £9.95 for the handles). The rest of the items were bits I had collected over the years, or craft supplies that I found lying around or hoarded in cupboards and drawers. Whether you rent or own your own home, if you have a space that needs a refresh, try the #UpForUpcycling challenge to create a look that’s not only unique, but will save yourself some money.